
The Real Scope of a Garage Door Opener Installation
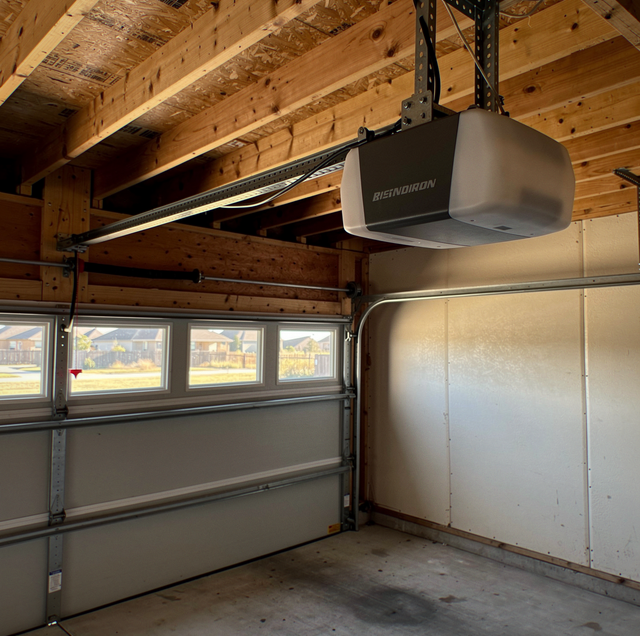
A new garage door opener ships as a kit: a powerhead, a length of rail, a trolley, a wall control, two photo eyes, a coil of low-voltage wire, and a bag of lag bolts and brackets. The installation visit is a different list, and a longer one. Removing the old system, correcting whatever the door itself is doing wrong, fastening the new unit into framing that can carry the load, wiring it, and testing it fill several hours, and none of that is printed on the box.
An installation is measured by whether the finished door opens on command, stops in the same place every cycle, and reverses off an obstruction without exception. Most of what decides that gets settled during the visit, in an order that matters.
Whether an older manual door can take an opener at all, which horsepower class it requires, and which brand belongs in the header are separate questions, already settled by the time a technician arrives with the new unit. The visit itself starts with the opener already hanging over your door.
The Old Opener Comes Down Before Anything Else Happens
The first stretch of the visit is subtraction. The old powerhead disconnects from the ceiling, the trolley releases from the door arm, and the rail comes down as a single unit rather than piece by piece. The header bracket above your door, the old wall control, and whatever low-voltage wire was stapled along the wall from the last install come out too, since a fresh opener runs cleaner on its own wiring than on someone else's splices.
What gets reused is decided on a case-by-case basis. A header bracket that's still straight and anchored into solid framing sometimes stays in place rather than being pulled and repatched. A wall control box, or a run of conduit already routed to a convenient spot, might get kept for the new low-voltage wire to follow. Everything with a motor, a gear, a chain or a belt, and any wiring carrying a cut or a questionable splice, comes out and gets replaced, since matching those parts to a different brand's control board isn't worth troubleshooting later. The one exception is a head and rail the manufacturer supports as a matched pairing within the same product line and generation, which can stay together instead of coming down.
Taking the old system down also brings a fair amount of information to light. Lag bolts that spin in place instead of backing out cleanly say the last install landed on something softer than framing. Wire staples driven through the insulation of a low-voltage run, or a splice wrapped in tape above a light fixture, say what the old wall control had been living with. None of that is visible while the previous opener still works, and all of it changes what the new install has to correct rather than repeat.
Before any new hardware goes up, the door itself gets assessed with the old opener disconnected. Whatever that assessment turns up gets corrected first, and the rest of the install waits on it.
A garage door's springs and cables stay under heavy tension at all times; a technician who finds a worn spring or frayed cable during the pre-install check flags it for replacement rather than working around it.
The Header Bracket and the Powerhead Go Into Solid Framing
The header bracket that anchors the rail above your door doesn't go into drywall or trim. It goes into the framing member or blocking that spans the opening, located and confirmed before a single lag bolt goes in. The powerhead at the far end of the rail gets the same treatment: its mounting bracket lands on a ceiling joist, or on blocking added between joists when they don't happen to line up where the rail ends.
The hanging hardware is part of that same decision. The powerhead sits below the joists on punched steel strap or angle, cut to the drop the ceiling actually calls for rather than left at whatever length came out of the bag, and braced so the unit can't travel along the rail. Strap left long and unbraced is one of the few install faults that works on itself.
The Rail Has to Sit Square and Centered Over the Door
The rail reaches its final position as a single assembled run, with the trolley already captive inside it. What's being proven at that stage is squareness to the header and position over the center of the door. A rail that ends up twisted or offset pulls the trolley at an angle instead of straight down the middle of the door, and it does that on every cycle for as long as it hangs there.
The door arm connects the trolley to the top section of your door. Its length and the angle it sits at are set by the door in front of it, because the arm is what turns the trolley's straight-line travel into the door's movement up and around the track's curve. An arm working at the wrong angle loads its own bolt holes instead of the section it's fastened to.
Low-Voltage Wiring Connects the Photo Eyes and Wall Control
Wire for the photo eyes and the wall control runs along the wall or ceiling and is secured out of the way, tucked along the framing or stapled high enough that a ladder or a stack of stored boxes won't catch it later. Wire left loose across the floor or draped where it can get pinched eventually fails.
The photo eyes mount low, close to the floor, at the height specified by the manufacturer for that model. Alignment between the pair is what that mounting has to hold, since a beam a fraction of an inch out of line can register as blocked or simply fail to find its partner across the opening. The wall control goes up inside the garage where it's both reachable and within sight of the door.
Travel and Force Get Set Against the Door That's Hanging There
Travel limits and motor force get established against the door hanging in your opening, not carried over as a generic setting from the box. Every door carries a different weight, a different balance, and different friction in its tracks, so the same opener set the same way on two different doors behaves differently.
The safety reversal test is what closes out the mechanical work. The door has to stop and reverse off an obstruction in its path, and it has to refuse to close at all while the photo eye beam is interrupted. Those are two separate protections that fail in different ways, and a door that satisfies both has proven it behaves correctly when something is underneath it. A job that skipped the door's mechanical condition earlier, or skips this test now, isn't finished, no matter how clean the rest of the work looks.
Coverage is set by the installer and the manufacturer separately, so ask what the labor warranty for the installation is and what the parts warranty for the opener is, and get both answers in writing.
Remotes, Keypad, and In-Car Controls Get Paired Last
Pairing comes after the mechanical and safety work, not before it, since there's no reason to sync a control to an opener that hasn't been proven to stop and reverse correctly yet. Each remote is paired individually with the receiver, along with any wall-mounted or wireless keypad and any in-car control system your vehicle supports.
Pairing is also the moment to account for existing controls. A keypad mounted outside the door and a spare remote sitting in a kitchen drawer both answer to the old receiver, and that receiver leaves with the old powerhead. Anything meant to keep working gets paired while the technician is still on site, since a control nobody mentions on install day turns into a second visit.
Range and response get checked from inside the garage and from the driveway, confirming the signal reaches where it needs to before the visit wraps up. A remote that works standing next to the powerhead but drops out at the end of the driveway isn't paired correctly, and it gets addressed before anyone calls the job done.
The Connections You Can't See Again Decide How Long the Opener Lasts
Once the dust settles and the door closes for the last time that day, most of what happened during the visit disappears from view. The lag bolts are behind a bracket, the wiring is tucked along a wall, and the travel and force settings live inside a control board. None of it gets looked at again unless something starts going wrong.
That's exactly why those pieces matter more than the badge on the powerhead. A header bracket anchored into real framing holds for years without anyone thinking about it, while one anchored into less than that becomes a service call nobody connects back to the install. A safety reversal tested against your finished door, rather than assumed to be fine because the last opener behaved, is the difference between a unit that stops for a person or a pet and one that doesn't.
The parts that get admired (the horsepower rating, the drive type, the brand name on the housing) are the parts anyone can compare on a spec sheet before the visit even starts. The parts that decide whether that opener is still running well after the novelty wears off are the ones nobody looks at again once the truck pulls out of the driveway.
What that adds up to is simple enough: install day is the last point at which any of it is cheap to correct. Adding blocking behind a bracket takes a few minutes while the ladder is up and the ceiling is still in view. The same correction, a year later, starts by taking a working opener back down to reach it.
Frequently Asked Questions
The manual release is part of the trolley assembly, and its cord and handle are hung during installation at a height an adult can reach from the floor without a ladder. The handle is red so it stays identifiable in a dark garage. If the cord hangs too short to reach comfortably, or long enough to catch on a roof rack, raise it before the technician leaves.
A keypad built for a different brand's receiver usually can't be reprogrammed to respond to a new opener's rolling code, even if the buttons and housing look interchangeable. Rather than trying to force a match, the technician typically swaps it for a keypad built for the new receiver. Remotes carry the same limitation across most brand pairings.
The steel J-arm bracket that connects the door arm to the top section is often reused if it's straight and its bolt holes haven't stretched from years of stress. A bracket that's bent, rusted through, or shows elongated holes gets replaced rather than reinstalled. Reusing a bracket is a judgment about the specific piece of steel in hand, not a policy applied to the whole set.
Battery backup is offered on DC-motor openers, but whether a given unit includes it depends on the model tier rather than the motor type by itself. Two DC openers from the same brand can differ on that point. It's worth confirming which tier is being installed if backup power during an outage matters to your household.
After travel and force are set against the finished door, the technician runs it through several full open-and-close cycles, watching for it to stop at the same points and reverse the same way each time rather than just once. A door that behaves differently on the third cycle than it did on the first usually points to binding or a balance issue outside the opener itself.
Yes, in most cases. A vehicle's built-in system such as HomeLink holds several codes independently, one per button, each established separately, so a household with more than one vehicle equipped with it still gets each vehicle programmed to the new opener on its own. Garage remotes from the same brand sometimes carry over between installs; built-in vehicle systems generally do not carry over automatically.
Ask what your installation estimate includes — knowing that up front tells you whether your door's mechanical condition and the safety reversal test are already covered before the crew starts. Arnold's Garage Door & Gates serves Fort Worth, Alvarado, and the DFW metroplex. Call Arnold: 682-337-7220.
