
How to Test Auto-Reverse and Photo-Eyes the Right Way
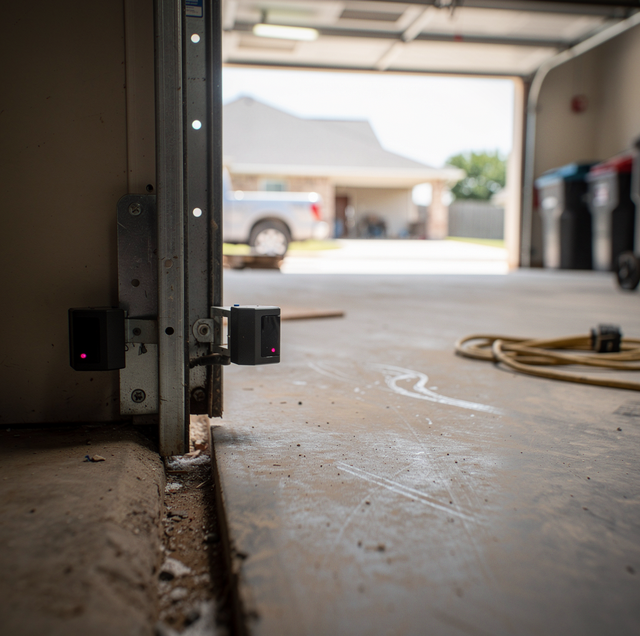
A garage door can weigh well over a hundred pounds, and it's supposed to stop or reverse before that weight reaches something soft, a foot, a hand, a pet crossing at the wrong moment. Two separate systems handle that: a force sensor built into the opener that responds to contact, and a pair of photo-eye beams mounted low on the tracks that respond before contact occurs. Most homeowners know the old trick of laying a 2x4 flat on the ground and watching the door bounce off it. Fewer know that trick checks only one of those two systems and can still miss a door set that's too aggressive to be safe.
Two Different Systems, Two Different Jobs
Auto-reverse and photo-eyes solve the same problem from opposite directions. The force sensor is a contact-based system: it measures resistance as the door travels and reverses once that resistance spikes past a set threshold, so the door has to touch something before it responds. The photo-eyes are a non-contact system: two small sensor units, one with a light source and one with a receiver, sit a few inches above the floor on either track and project an invisible beam across the opening. Break that beam while the door is moving down, and it reverses instantly, no contact required.
Because these are separate systems on separate hardware, one working correctly tells you nothing about the other. A door can reverse perfectly off a solid obstruction while its photo-eyes sit misaligned and blind to anything crossing lower in the opening. Testing only one and assuming the other is fine is the exact gap that leads to closed-door incidents a full test would have caught months earlier.
What the 2x4 Test Actually Checks
The 2x4 test is a real, established check, worth doing, just not the whole picture. Lay a piece of two-by-four lumber flat on the ground, centered in the door's path, then run a normal close cycle from the wall control. A door with correctly set auto-reverse force should touch the board and immediately reverse back open rather than press down on it. That test verifies the contact sensor is switched on and reacting to something, which matters, since a sensor that's been disabled or bypassed obviously fails everything downstream of it too.
Where it falls short is precision. A rigid board offers immediate, solid resistance the instant the door touches it, so even a force setting turned up well past a safe level can still bounce off a 2x4 convincingly. The board never gives, so the door never has to press hard before the sensor registers resistance and trips. That same door, dialed to the same aggressive setting, can still land with real force on something that isn't rigid, a hand, a small pet, a bag left in the threshold, because those don't create the same instant resistance a 2x4 does. Passing the board test tells you the sensor works. It doesn't tell you the actual force behind that reversal falls within a safe range.
Testing Auto-Reverse Force the Right Way
Start with balance, not force: Before testing the sensor, disconnect the opener using the release cord and lift the door by hand to roughly waist height. It should stay put rather than sliding down or drifting up on its own. An unbalanced door strains the opener, which is often compensated for by a force setting higher than it should be, skewing every test that follows. If it won't hold at half open, that's a spring or cable issue to address first.
Run the obstruction test more than once: Reconnect the opener, lay a rigid board flat across the center of the opening, and close the door from the wall control. It should stop and reverse within about two seconds of contact, without grinding down on the board first. Run this two or three times. A door can pass on one attempt and hesitate or push through on the next, especially near the edge of an acceptable setting.
Check the reversal itself, not just that it happened: The door should travel back to a fully open position, not stop halfway. A reversal that stalls partway is its own failure and points to a separate problem in the travel limits or opener logic that a board test won't diagnose.
Measure actual force when you can: A rigid board only tells you the sensor fires; it doesn't tell you how hard the door was pressing when it did. Most manufacturers publish a maximum allowable closing force in their manual and on the unit's data plate. Checking the measured force against that number takes a proper force gauge held at the door's leading edge during a close cycle, not a guess based on how the board test looked. If a gauge isn't on hand, or the reading comes back close to or over what the manual allows, that's a call for a technician to verify and adjust the setting rather than turning a dial by feel.
Testing the Photo-Eyes the Right Way
Look at the lights before you test anything: Each sensor unit has a small indicator light. A steady, solid light on both sensors generally means they're aligned and seeing each other across the opening. A blinking light on either one signals misalignment before you even run a test, often from a bumped bracket, a stored ladder leaning against it, or a mower clipping the track during yard work.
Break the beam without touching the door: With the door fully open, start a normal close cycle, and while it's traveling down, pass a broom handle or a similarly long rod through the beam path low near the floor, without letting it touch the moving door. The door should stop and reverse immediately, before the interruption ever becomes contact. If it keeps closing, treat that as a failed safety system, not a maintenance item for later.
Test each sensor on its own: With the door open and before starting a close cycle, hold a piece of cardstock in front of one sensor lens at a time to block it. The opener should refuse to start closing, usually with the wall control or ceiling unit light blinking a specific pattern. Check that pattern against the manual's blink codes; it typically points straight to a sensor fault.
Retest after anything bumps the brackets: Photo-eye brackets sit low, exactly where they get nudged by bikes, stored items, or a vehicle pulling in slightly off-center. A sensor can still show a steady light and still miss an object at the specific angle the door passes through if it's been knocked slightly out of true alignment. Any time a bracket has been touched or looks even a little off, rerun both the individual-sensor test and the beam-break test before trusting it again.
Why Skipping Straight to the Board Test Misses Real Failures
Picture a household that runs the 2x4 test once a year, watches the door bounce back cleanly, and calls it done. Meanwhile, a storage tote gets shoved against one sensor bracket over the winter, nudging it a few degrees out of alignment. The indicator light might still glow, since the sensors can register each other even without fully capturing the width of the opening lower down. The board test the following year still passes, because that test never engages the photo-eyes at all; it's entirely a contact-force check. A child's foot or a pet crossing right where the beam has drifted away from would never trigger a stop, because nothing in that testing routine ever asked the photo-eyes to do their job.
Force settings drift too, usually without anyone touching the dial on purpose. As a torsion spring loses a bit of tension over months of daily cycles, an opener sometimes gets nudged toward a higher setting to compensate for a door that's become harder to lift. A board test can still look fine at a higher setting, since the board resists immediately regardless of how much force is behind the motor. What changes is how hard the door lands on something that isn't rigid, which the board test was never built to reveal.
When to Stop Testing and Call a Professional
Any of these outcomes means the door isn't ready to be trusted around people or pets: it doesn't reverse off a rigid obstruction at all, it reverses only after pushing down noticeably first, the reversal stalls partway rather than returning to full open, a photo-eye light blinks after a realignment attempt, or the beam-break test doesn't stop the door before contact. None of those are adjustments to make by feel. The force dial, travel limits, and sensor alignment all interact, and a change meant to fix one symptom can quietly push another setting out of a safe range. Using the manual disconnect to bypass a failed system defeats the purpose of testing it, since it removes both safety systems from the equation instead of fixing either one.
How Often to Run Both Tests
Most manufacturers recommend testing both systems monthly, more often than most households actually do it, though it only takes a couple of minutes once the steps are familiar. Beyond that habit, retest immediately after any opener service, after anything bumps a sensor bracket, after adjusting the force or travel limits, and any time the door has felt even slightly different closing, faster, slower, or with a new sound near the bottom of its travel. A door that's felt fine for years can develop a fault overnight from something as small as a shifted bracket, and the only way to know both systems still work is to actually run both tests rather than trust that last year's board test still applies.
Frequently Asked Questions
Yes. It's a fast way to confirm the contact sensor is switched on and reacting at all, which is a real and necessary check. The issue isn't the test itself; it's treating it as the only test needed when it was never designed to check the photo-eyes or measure actual closing force.
A standard 2x4 laid flat, so its narrow face is up, is the typical reference size manufacturers describe in their manuals. Using something noticeably thinner or thicker changes the point of contact and can produce a misleading result, so stick with the size the manual calls for rather than whatever scrap is nearby.
A solid light means the two sensors can see each other, not that the beam covers the full width the door actually needs protected. Misalignment can be subtle enough that the units still register each other while missing an object lower or off to one side. That's a sign the brackets need to be checked and realigned, then retested, rather than a sign the sensors are fine because the light looks normal.
Adjusting the dial is possible, but doing so safely means verifying that the resulting force stays within the limits specified in the manual, not just checking whether the board test looks better afterward. Without a way to measure actual force, an adjustment can trade one problem for another: too sensitive and reversing on nothing, or not sensitive enough and still landing hard on something soft.
It should be close to immediate, generally within about two seconds of contact, not a pause where the door continues pressing down before responding. A noticeable delay between contact and reversal is itself a sign the force setting or the sensor's responsiveness needs attention.
It means the two required safety systems are doing their job that day. It doesn't cover worn cables, a spring nearing the end of its life, or a track that's slightly out of square, all of which affect how the door behaves even when auto-reverse and the photo-eyes both test correctly. These tests are one part of keeping the whole system safe, not a substitute for a broader check.
Schedule a full auto-reverse and photo-eye safety check — Arnold's Garage Door & Gates tests both systems with a force gauge, not guesswork, and adjusts or repairs whatever a 2x4 test alone can't catch. Arnold's Garage Door & Gates serves Fort Worth, Alvarado, and the DFW metroplex. Call Arnold: 682-337-7220.
